Showing posts with label DIY. Show all posts

Saturday, June 6, 2015

4th of July Wreath


Hello everyone! I have been MIA for a while due to my work schedule. I was able to get a chance to finally craft something up. July is coming next month and I have never done a 4th of July wreath. So I decided to make one. I looked to Pinterest for inspiration and came across one like this one. It was being sold on Etsy but it was too expensive for me at the moment. So I made my own wreath. I didn't want to copy the exact one that was being sold. I wanted to change it just a bit. I added the American Flag and the bow is a different color. The American flag means so much to me because 1.) I am a proud American, 2.) My husband was in the military, and 3.) I was a proud military wife. Even though he is no longer in the military I honor every soldier that put their lives in danger to keep our country safe as well as those that lost their lives in battle. They are all my Hero's and I respect what they do for our country. I was actually able to put my wreath up for Memorial Day to honor those who lost their lives in battle. My husband really liked it and told me I should put it up so I did. It will go back on on July to honor all those soldiers who have served and are currently serving. Everything I used was bought at Hobby Lobby except for the starry burlap and the flag. Here how my wreath turned out.

I didn't think the USA letters were going to hold well but they did pretty good. I hot glued the letters together and then glued it to the wreath.


So that is my 4th of July wreath! Hope you like. Have a nice day!

Nayeli

Saturday, March 28, 2015

Spring Wreath

It is Spring! And what do I love the most about Spring? The beautiful flowers that bloom around this time. I needed a Spring wreath for my front door but I wasn't sure how I wanted to make it. All I knew was that I wanted pretty pink flowers and burlap. I always make burlap wreaths because I simply love burlap. I searched Pinterest for ideas and inspiration. Here is what I came up with!


I am very pleased with this wreath and will keep it up until its time for Fall decor. I really love the little jewels I wrapped around it. It is actually a garland that I bought from Michaels. I love sparkly things so it goes well with my personality. This wreath turned out to be quite pricey but it was worth it for me. Everything was bought from Michaels. Unfortunately I don't have a tutorial for this. I'm sorry! Just thought I would show you all what I created for my Spring wreath! Happy Spring to you all!


Nayeli

Wednesday, March 11, 2015

DIY Decorative Pillows Part 2

Hello! Today's post is going to be about part 2 of my DIY decorative pillows part 2. I have always wanted gold polk a dot pillows. My first thought was to use regular white material but I thought burlap would be much better. I went looking for them at stores but couldn't find any at the time. So I decided to make my own and I'm sure it would be so much cheaper if I made them myself. Little did I know it would be time consuming! I am still happy with how they turned out. Now that Spring is here I happened to find burlap pillows with gold polk a dots! But they were $20 each and I needed 2 of them.  Making my own, I spent less than half the price. I would say $7. I  am pretty pleased with how they turned out even though it was so time consuming.


Here are the materials I used to make these pillows

18x18 burlap pillowcases (you can buy ones already made at Hobby Lobby)
Pen
Penny
Gold glitter
Gold acrylic paint
Mod Podge
Card board to put inside the pillow cases so the Mod podge wont seep through the other side

With a penny coin trace around it with a pen to make the polk a dots. Keep making them about 1/2 inch apart until the entire pillowcase is covered in polk a dots.


Now you can either "paint" each circle with ModPodge and glitter them or you could do what I did, paint each circle with gold acrylic paint. Make sure you place a card board inside the pillowcase

This is why it was so time consuming for me. After I finished painting each circle and letting them dry I went over them with ModPodge and then placed glitter on all the circles.


The reason I did it this way was because using just modgepodge and glitter, you could see the pen marks a little. Being the pick person that I am, I did not like that. So I painted first with gold paint, modpodged each circle and added the glitter. Once you are done shake off all the glitter into a sheet of paper and clean up. I let that dry about 30 minutes and then added modpodge to each circle again to seal in the glitter and prevent fall out. Let dry for an hour.


Do this to all the pillows you made. Making two was tiresome but as I said earlier it was well worth it and cheaper. Your product is now finished. Hope you enjoyed!

Nayeli

Sunday, March 8, 2015

DIY Decorative Pillows Part 1

Hello all! Lately I have been redecorating my living room changing everything from golds and reds to golds, whites, and blacks. I  have been looking for certain kinds of decorative pillows but they are either too expensive or they didn't have what I was looking for. So, being the crafty girl that I am, I decided to make my own pillows! I made burlap pillows with gold polk a dots and black pillow with a gold heart. One of the pillows I bought already made and it cost $22. I needed a total of 3 so that would have cost $66. Not what I wanted to spend. I will talk about how I made the polk a dot pillows in part 2. This post is about the black with gold heart pillow. Here is what the decorative pillows I made look like.


Making this Gold heart pillow was very easy to make and less time consuming. I don't have a tutorial on how I made these pillows but there are many tutorials on how to make a pillow on Pinterest. I used a sewing machine to make mine. These pillows are 18x18. I bought 1/4 yards of black material to make this pillow. Here is how I made the gold heart. You will need

Gold material (I bought mine at hobby lobby where all the felt material is)
Heart stencil (You can find all kinds of printable heart stencils online)
Marker
Scissors
Hot glue gun/fabric glue
Pillow stuffing

Cut out your heart stencil with scissors

Now that you have your heart stencil cut out flip the gold material over where the white part of the material is. Place your heart stencil on it and trace it with the marker. Then cut the heart out.
Place the gold heart on top of your already made pillow case to see if you like the placement of the heart.
Now turn over the heart to the white part and put hot glue all around the heart quickly and turn it back around to glue it on the pillow case. If the some of the hot glue has already dried and isn't sticking add more glue in there until there are no gaps. Make sure all the edges are glued well to the fabric. Now you can stuff your pillow case with pillow stuffing and sew, hot glue, or seal the opening with fabric glue. Let dry for a while if using fabric glue. Fabric glue can be tricky to work with when closing the opening of the pillow case. What I suggest is using books to put pressure on the side you just glued. Now your pillow is ready to place on your couch or bed. Hope you like this post. In the next post I will show you how I made the polk a dot ones!


 Thank you for reading!

Nayeli 

Tuesday, December 30, 2014

Frosty Glittery Votive Candle Holder

Hello! Well I must say I am pretty upset that I was not able to post any of my Christmas Crafts because my laptop broke down. It just doesn't want to turn on! So I am using my husbands old laptop which is not that great but hey its something! At first I couldn't use it because there was a virus and all these pop ups kept coming up making it hard to browse the internet. But I am back now and able to post. So on with this votive candle holder! I made two different ones. One was for me and the other one was a mason jar that had all these Christmas gifts inside for my sister in law. She can also use it as a candle holder.


This is the one I made for my sister in law


So how did I make these? These were rather easy to make! There is a lot of tutorials out there on how to get this frosty look. I will show you how I did mine anyways so lets get started!

Materials needed
Clean Jars of your choice
Glitter of any color you like (I used pink, gold, and white glitter)
ModPodge
Paint Brush/Sponge brush
Bowl

First you grab any jars you might have laying around or you can buy mason jars at your local craft store.

Now you will mix all the glitters you chose in a bowl. I used Gold, Pink, and White. Mix the glitters well. When you mix your glitters put as much as you want. Play with them. That is what I did until I was satisfied with how the mixture of glitters looked together.
Pour some ModPodge into the bowl and mix with the glitter. I did not measure how much to mix in the glitter. I wanted the mixture to look frosty so I started off by pouring ModPodge little by little in the bowl and mixed until I got a thick pasty consistency. I hope the next picture shows the consistency I got. There should be a lot more in the bowl but I had already covered my jars in the mixture. I realized I forgot to take a picture and did so before I finished.

It is time to cover the outside of your jars with the mixture. Spread in a patting motion all around the jar, For the mason jar I used one layer and for the little candle holder I used two layers.

Allow to dry for a full day. Once it is dry you will notice the jars are not white anymore. That's how you know they are dry. OR you can tough them to see if they are dry too. Now you are finished! Aren't they pretty?!

 They look so pretty lit up! You can put any small candle to illuminate the jars. I just love how they turned out!

That is it for today. I will post my Christmas owl pillows soon I hope. Even though Christmas is already over I will still post them. Oh and these glittery frosty votives can be given as gifts for any occasion! Until next time!

Nayeli

Friday, December 19, 2014

Reindeer Wall Art


Hello all! In this post I do have a tutorial! This is a reindeer wall art that I saw on Anneorshine's Youtube channel. I just love how hers turned out! Mine came out decent lol. I am still pretty pleased with the turn out. I wanted to add a red poinsettia to my reindeer like Anneorshine, but 1. I didn't want to copy her too much and 2. A red poinsettia wouldn't have gone with my blue, silver, and gold Christmas theme in my living room. My husband thought it would be best to just put a white one on it. I had a burlap poinsettia on it as well but my husband didn't like how it looked. He thought it was too much and it hid the reindeers ear. So I kept it with a simple white poinsettia. What do you think? Also, I would like to add that this photo had to be taken outside. I wish I could have taken one inside with all my Christmas décor but the lighting in my living room is terrible! There is basically no light in my living room. That's how this apartment is set up. I have a basic lamp but the photos were not coming out right so I had to take picture outside. You will see in a minute what I mean.
 
Here I added the blue poinsettia to see a different way to make it
Anneorshine's tutorial is on this link. http://youtu.be/oFbxYVVvL0U
This is what I did.
I used a 20X16 canvas. I first used painters tape and taped it on my canvas like so.

Then I began to paint the white parts with gold acrylic paint. This took several coats. I used a sponge brush and for some reason it just wasn't sticking to the canvas.
I used my fingers instead and got it to be somewhat opaque. I quickly added the gold glitter.
When I shook off all the glitter I noticed the glitter wasn't sticking very well so I decided to use my trusted method. ModPodge! Note: Do not do this on your carpet like I did! lol I had to move outside in the patio when using the glitter.
What I did here is I put one coat of ModPodge on the glitter that was already on the canvas. I let that dry for a little and then added more glitter to make it opaque. Then I added another layer of ModgePodge over that and let it dry for a few hours to seal in the glitter. Then I gently removed the painters tape.

Tada!! I let this sit for a day to completely dry. It was already late that night so I decided to leave it for another day. On to the reindeer head! Now I'm not a very good drawer like Anneorshine so I found this template on google search and used this one.
 
I cut traced the shape on cardboard that you can buy at Walmart and cut it out with a exacto knife.
Sorry this is so gross! I had used the top of a pizza box to do this to show you an idea but I did not use this. I forgot to take a picture of the process with the cardboard I found at Walmart so I got the pizza box my husband had on the table and redid this to show you a picture of what I did. I dont have a picture of me glittering the reindeer head but I used the ModPodge method. I first put a later of it on the head and then covered it with glitter. I let it dry for 2 hours and then put another layer of ModPodge to seal in the glitter to prevent any fallout.


I found this little cup laying around that I dont use anymore. I painted it gold and let it dry. Last I placed this in the center of my canvas and hot glued it down. Last I hot glued the reindeer head on it and glued the white poinsettia. Sorry I did not take pictures of the entire process!! I totally forgot about it. When I craft I just get so into it that I forget to take pictures to provide a tutorial. I will try harder next time!

 I think I like it with the blue poinsettia better!


Nayeli


Thursday, December 4, 2014

Santa owl wreath


Hello! Today I have a cute Christmas owl wreath I made. Well, actually this owl wreath was already made for the Fall. I just changed it up to make it a Christmas owl. I changed the flowers which make the eyes to poinsettias and added a Santa hat. I think it looks so cute!


Sorry this blog is not very long. Just wanted to show the cute Christmas owl wreath I made. ^_^

Nayeli

Friday, November 21, 2014

Fall Glittery Mason Jar.

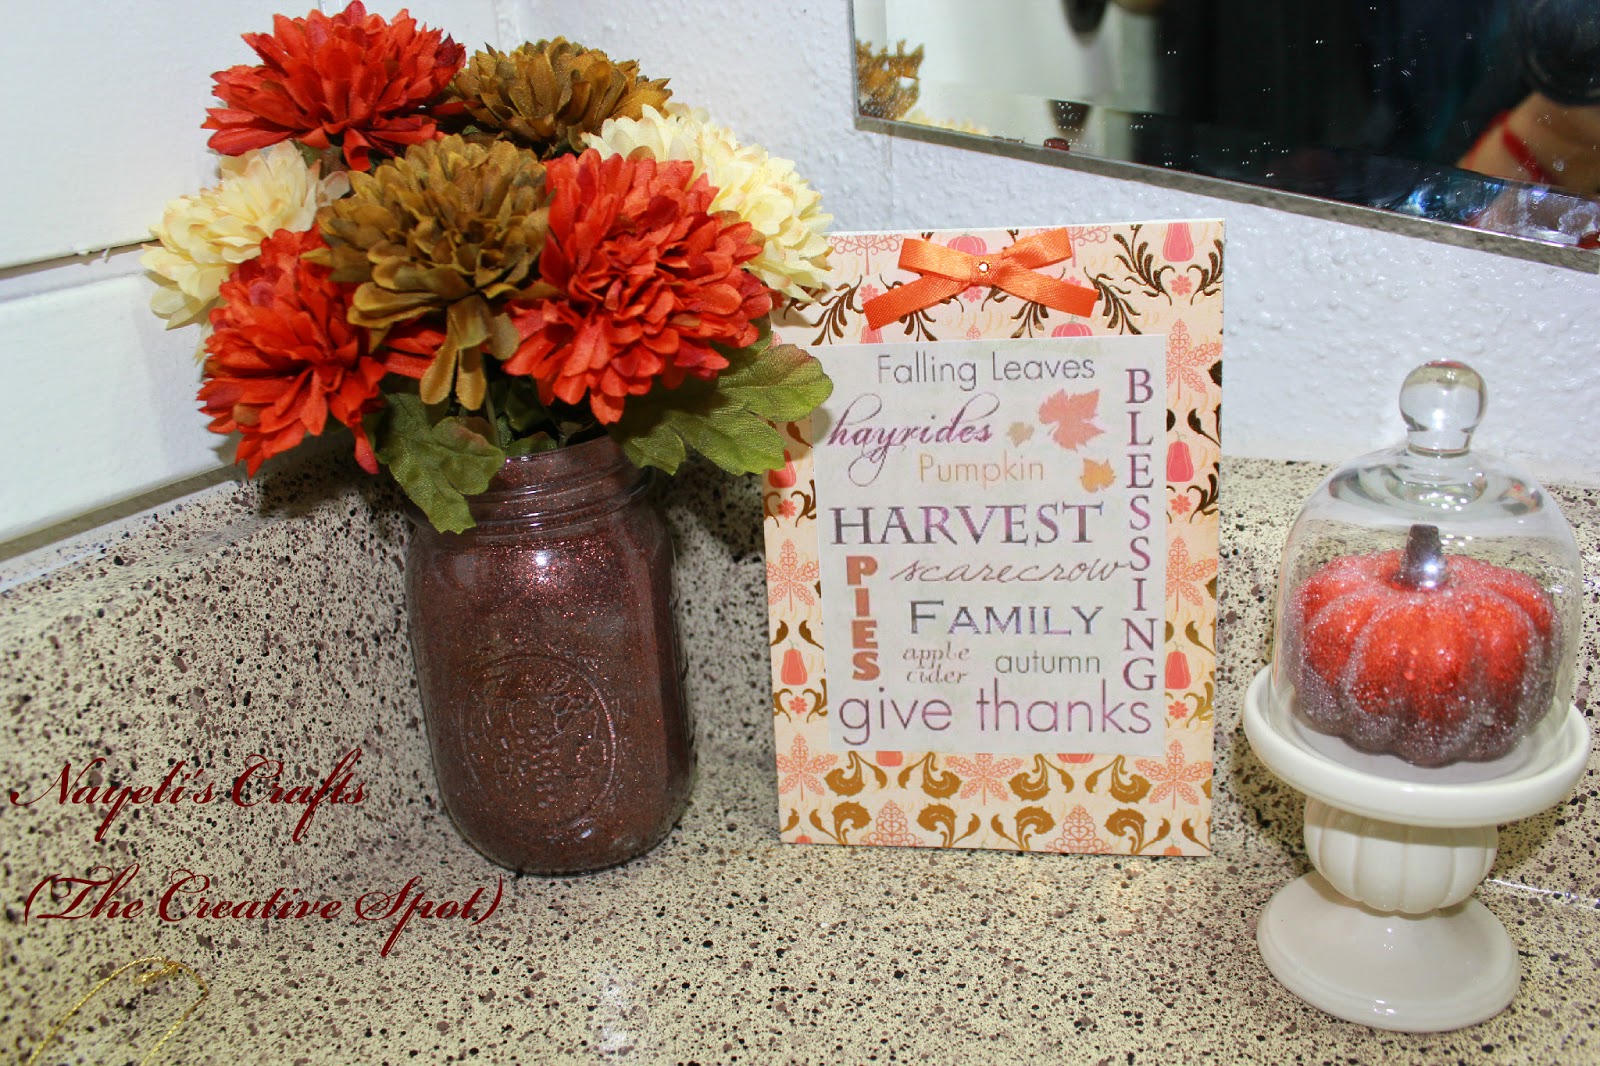
Hello! I'm falling behind on positing my Fall crafts so I am posting 2 posts a day before the month of November ends. I  have just started working on Christmas DIYs that I can't wait to post! So I have seen many tutorials on how to glitter mason jars. I have always wanted to do one but never got around to it. I wanted to add a pretty floral arrangement in my bathroom to decorate for the Fall. I love glittery things so I decided why not glitter a mason jar with brown glitter and add some pretty flowers! Here is what my floral arrangement in my bathroom looks like.


The little Fall sign I made using a 5X9 canvas but I will post about that tomorrow.

I just love the glitteryness of this mason jar! I think I will make some glittery silver ones for my Christmas Theme in my living room!
One more picture! Haha. Until next time!

Nayeli


Fall Wall Art Canvases

Hello all! This month I have been a busy crafting bee! I wanted to make my own Fall wall art using 12X12 inch canvases. Doing these were very easy. Unfortunately I didn't get a chance to take pictures for a tutorial. With working full time and coming home to do my wife duties I don't get a chance to take pictures of most of my crafts for tutorials. I will try my best to put tutorials in the future. So here is the wall art I made for the Fall/Thanksgiving.


 I love the scrap book paper I used to make these Fall wall art. This project involved a lot of modpodge and glitter.
 This are Fall sticker I found at Hobby Lobby. I love how the leaves look on this one.


So what I did was buy some Fall scrapbook paper. You can find them at any craft store. I bought mine online. These are some of the materials you will need.


I forgot to put the glitter I used in this picture and I did not use the 5X7 canvases in the picture. Ok so the materials here are:
4 wooded letters
Fall stickers
Fall scrapbook paper
4 12X12 canvases
Mod Podge
Gold glitter
Sponge brush
 
Now on to the instructions!
 
Fill up the sink with water. Then dip one of the scrapbook paper into the water slowly. You have to be very careful doing this because if the scrapbook paper is too thin it will rip apart. The ones I used were thicker which saved me from destroying the paper.
 
Next place the wet scrapbook paper on top of one of the canvases and align them. Now lift the left side slowly and put some Mod Podge on the canvas. Smooth out. Do the same steps for the right side and smooth out. Put aside to dry and continue with the other canvases.. *Note: Sometimes air bubbles form so put a heavy book on top to keep it from forming air bubbles. I let mine dry overnight.
 
Once the canvases are completely dry spread Mod Podge all over canvas to seal and give it some shine. Let dry for a few hours. Now you can choose to either paint the sides of the canvases with paint or glue some pretty ribbon around them so the white sides wont show. This is optional. I painted mine.
 
Now on to the FALL letters.
 
cover each letter with Mod Podge and sprinkle with gold glitter all over. I used refined glitter instead of regular glitter. Let dry completely. Once dry, cover each letter with one layer of Mod Podge. This will seal in the glitter and prevent fall out. Let dry. For one of the L wall art pieces I placed the Fall leaf stickers around.  Now its time to glue the letters in the center of each canvas. One dry your wall art is now ready to be placed on your wall!
 
I really love how they turned out! They look perfect with the fall theme in my living room. Hope the instructions weren't too hard to follow. Until next time!
 
 
Nayeli


Tuesday, November 18, 2014

Fall Owl Burlap Wreath


It's been a while since I have blogged. I am terrible with managing my time. I have been working and learning a lot at my new job and married life that I have not had a chance to blog. Finally, I found the time to blog today! I have a few crafts that I made that need to be blogged. So last time I blogged, I wrote about my Burlap Owl wreath. I decided to update my wreath because I felt like it needed something. I added some glittered fall leaves that I glittered myself. I didn't get a chance to take a step by step photo for a tutorial but its rather easy. All you need is fake Fall leaves that you can purchase at any craft store, Mod Podge, and glitter. You first cover the leaves in Mod Podge and then cover with glitter. Let dry overnight and add another layer of Mod Podge. This keeps the glitter from falling out. If you want to do the back of the leaves follow the same steps. I didn't glitter the back sides since I was going to glue mine on my wreath. Here is what my Fall owl burlap wreath looks like now. I am very pleased with it now!
IMG_2389editededited


IMG_2398edited
Close up of the glittered fall leaves.
IMG_2396edited

IMG_2397edited
So there you have it. By the way I have no idea how to resize these photos! Large is to big and Medium is too big. I can never get it the size I want. Anyways, there are more crafts coming!
Nayeli