Thursday, December 4, 2014

Santa owl wreath


Hello! Today I have a cute Christmas owl wreath I made. Well, actually this owl wreath was already made for the Fall. I just changed it up to make it a Christmas owl. I changed the flowers which make the eyes to poinsettias and added a Santa hat. I think it looks so cute!


Sorry this blog is not very long. Just wanted to show the cute Christmas owl wreath I made. ^_^

Nayeli

Friday, November 21, 2014

Fall Glittery Mason Jar.

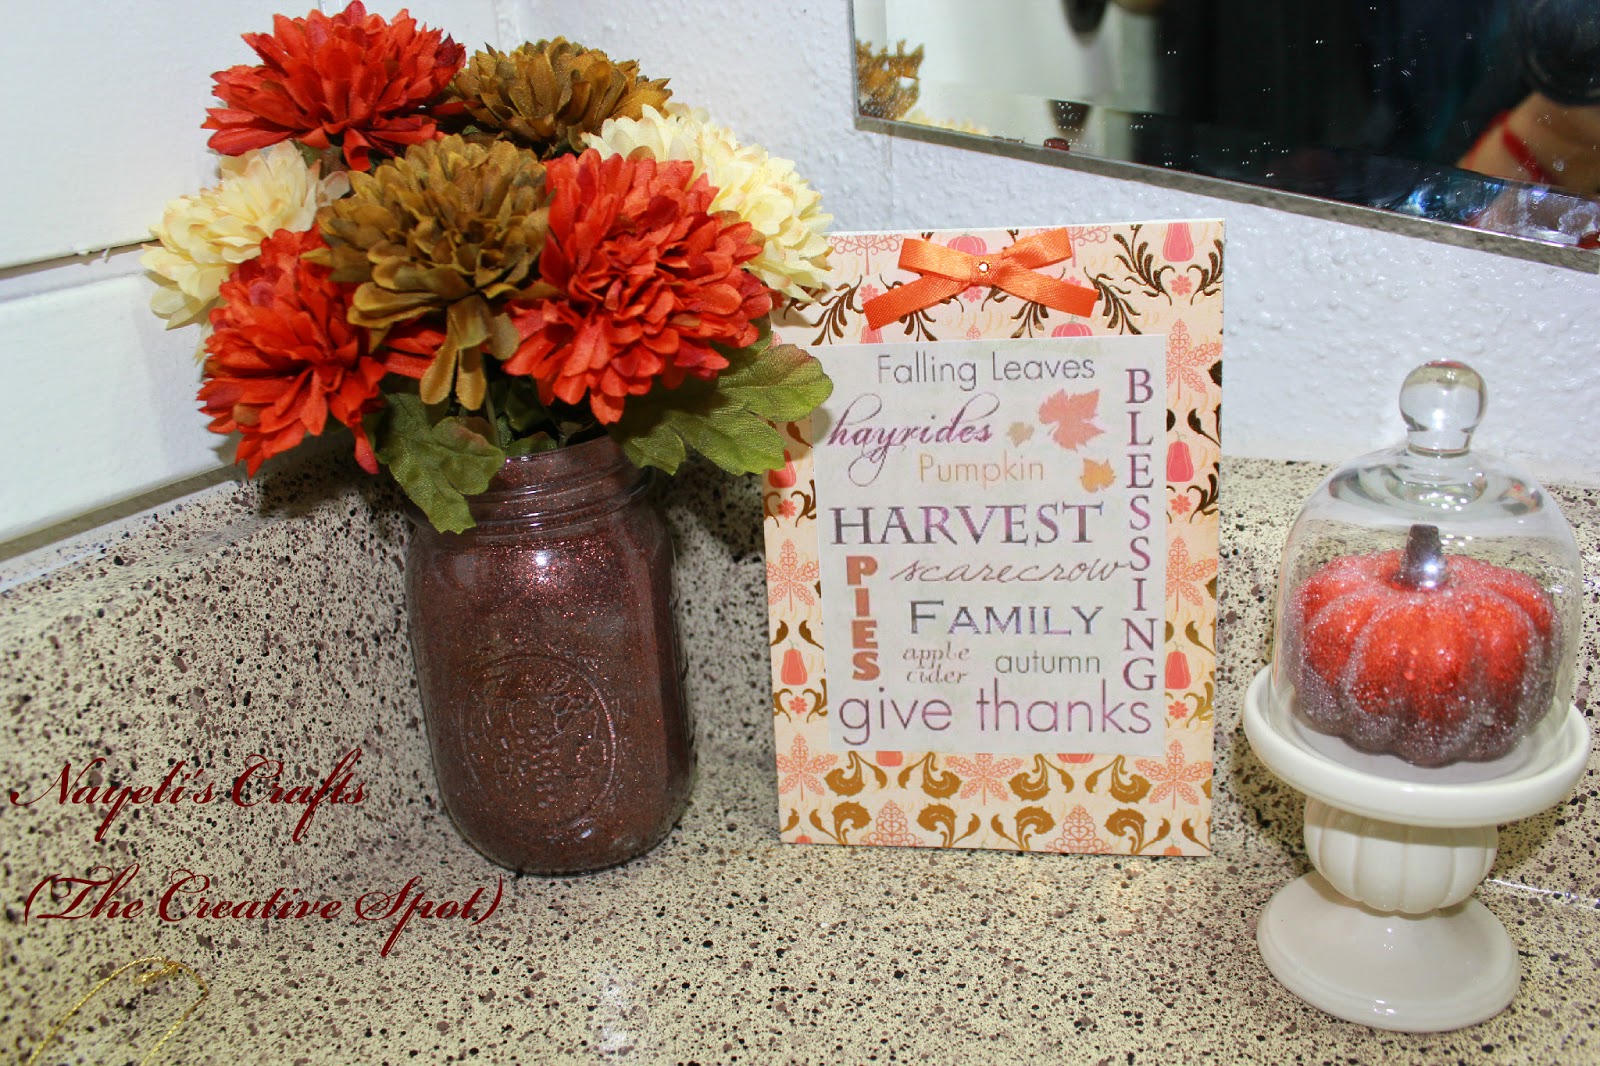
Hello! I'm falling behind on positing my Fall crafts so I am posting 2 posts a day before the month of November ends. I  have just started working on Christmas DIYs that I can't wait to post! So I have seen many tutorials on how to glitter mason jars. I have always wanted to do one but never got around to it. I wanted to add a pretty floral arrangement in my bathroom to decorate for the Fall. I love glittery things so I decided why not glitter a mason jar with brown glitter and add some pretty flowers! Here is what my floral arrangement in my bathroom looks like.


The little Fall sign I made using a 5X9 canvas but I will post about that tomorrow.

I just love the glitteryness of this mason jar! I think I will make some glittery silver ones for my Christmas Theme in my living room!
One more picture! Haha. Until next time!

Nayeli


Fall Wall Art Canvases

Hello all! This month I have been a busy crafting bee! I wanted to make my own Fall wall art using 12X12 inch canvases. Doing these were very easy. Unfortunately I didn't get a chance to take pictures for a tutorial. With working full time and coming home to do my wife duties I don't get a chance to take pictures of most of my crafts for tutorials. I will try my best to put tutorials in the future. So here is the wall art I made for the Fall/Thanksgiving.


 I love the scrap book paper I used to make these Fall wall art. This project involved a lot of modpodge and glitter.
 This are Fall sticker I found at Hobby Lobby. I love how the leaves look on this one.


So what I did was buy some Fall scrapbook paper. You can find them at any craft store. I bought mine online. These are some of the materials you will need.


I forgot to put the glitter I used in this picture and I did not use the 5X7 canvases in the picture. Ok so the materials here are:
4 wooded letters
Fall stickers
Fall scrapbook paper
4 12X12 canvases
Mod Podge
Gold glitter
Sponge brush
 
Now on to the instructions!
 
Fill up the sink with water. Then dip one of the scrapbook paper into the water slowly. You have to be very careful doing this because if the scrapbook paper is too thin it will rip apart. The ones I used were thicker which saved me from destroying the paper.
 
Next place the wet scrapbook paper on top of one of the canvases and align them. Now lift the left side slowly and put some Mod Podge on the canvas. Smooth out. Do the same steps for the right side and smooth out. Put aside to dry and continue with the other canvases.. *Note: Sometimes air bubbles form so put a heavy book on top to keep it from forming air bubbles. I let mine dry overnight.
 
Once the canvases are completely dry spread Mod Podge all over canvas to seal and give it some shine. Let dry for a few hours. Now you can choose to either paint the sides of the canvases with paint or glue some pretty ribbon around them so the white sides wont show. This is optional. I painted mine.
 
Now on to the FALL letters.
 
cover each letter with Mod Podge and sprinkle with gold glitter all over. I used refined glitter instead of regular glitter. Let dry completely. Once dry, cover each letter with one layer of Mod Podge. This will seal in the glitter and prevent fall out. Let dry. For one of the L wall art pieces I placed the Fall leaf stickers around.  Now its time to glue the letters in the center of each canvas. One dry your wall art is now ready to be placed on your wall!
 
I really love how they turned out! They look perfect with the fall theme in my living room. Hope the instructions weren't too hard to follow. Until next time!
 
 
Nayeli


Tuesday, November 18, 2014

Fall Owl Burlap Wreath


It's been a while since I have blogged. I am terrible with managing my time. I have been working and learning a lot at my new job and married life that I have not had a chance to blog. Finally, I found the time to blog today! I have a few crafts that I made that need to be blogged. So last time I blogged, I wrote about my Burlap Owl wreath. I decided to update my wreath because I felt like it needed something. I added some glittered fall leaves that I glittered myself. I didn't get a chance to take a step by step photo for a tutorial but its rather easy. All you need is fake Fall leaves that you can purchase at any craft store, Mod Podge, and glitter. You first cover the leaves in Mod Podge and then cover with glitter. Let dry overnight and add another layer of Mod Podge. This keeps the glitter from falling out. If you want to do the back of the leaves follow the same steps. I didn't glitter the back sides since I was going to glue mine on my wreath. Here is what my Fall owl burlap wreath looks like now. I am very pleased with it now!
IMG_2389editededited


IMG_2398edited
Close up of the glittered fall leaves.
IMG_2396edited

IMG_2397edited
So there you have it. By the way I have no idea how to resize these photos! Large is to big and Medium is too big. I can never get it the size I want. Anyways, there are more crafts coming!
Nayeli

Monday, March 10, 2014

Burlap lace and rose canvases


Hello! As many people may know, I am obsessed with burlap. I LOVE burlap. So a few months back I decided I wanted to make some cute burlap canvases with pink and white lace with pink and white roses. I wasn't sure how to go about it but I knew I wanted to make roses out of material. I was browsing google on how to make roses out of material when I came across several blogs on how to make t-shirt roses. I loved how they looked so I looked up youtube on how to make them. I got an old shirt of the college I went to and cut up strips to make these roses. I didn't have a pink shirt so I decided to dye some of those strips. I had some red food coloring that I had bought to make candles. I poured several drops in water and then just dipped the strips for an hour. I had to play it by ear because I did not know what I was doing here. lol I was afraid they were going to be too pink and I wanted a light pink. I was able to get the perfect light pink color through experimenting. I made sure I squeezed all the water out and just hung them with clothespins. I put a towel under the strips in case they dripped any water. I let them dry overnight. In the meantime I made the white roses and hot glued white and pink pearls in the center of them. I also decorated the burlap canvases with lace and ribbon. For the pearl flowers I just hot glued pearls into the shape of a flower and then put tiny string beads on each open corner. These were a pain in the butt to do. It takes a lot of patience to do because they will keep falling apart. I'm a jobless military wife who has lots of time in her hands so I have room for patience. lol Its been hard trying to find a job. It took me several tries to get them right. Once the pink strips were dry I proceeded to make the roses. It took me a few days just to figure out how I wanted to place these roses on the canvases but in the end I was very pleased with the turnout. I love how they look in my desk! Here is what they look like!

I am a bit disappointed that my pictures would not come out the way I wanted them to. The light that comes into my apartment is terrible. I wasn't able to capture the actual colors of the canvases. I used the flash too and I just wasn't happy with how they were coming out. So I took them with my Ipad. lol It was the only thing that capture the true colors of my canvases. Here are more close ups of my creations


So there you have it! My burlap, lace rose canvases! I have other crafts I have coming up so I can blog about them. Until next time!

Nayeli

Sunday, February 9, 2014

Doily and Paper Medallion Wreath

So I came a cross this blog http://www.makinghomebase.com/valentines-day-wreath/ and loved the wreath Chelsea made. I loved how classy and elegant it looked compared to other typical pink and red wreaths (My wreaths). My wreaths look very Valentine-ish. lol This wreath looks like you could use it all year long because it doesn't look so Valentine-ish. So I got inspired to do one like hers. I love how the brown paper medallions and red made the twigs of the wreath pop out. As soon as I saw her post on this wreath I went straight to Joanns Fabrics to get the materials. I was so excited to start this wreath! I didn't want to copy my wreath exactly like hers. I wanted to change things up a little. So in her wreath she has doilies with the words XO on them and the paper bag medallions have glittery red hearts in the center. She also has a cute burlap garland in the middle with glittery red hearts. I love that part. To hang her wreath she has a red ribbon in the center holding the wreath. The only thing I copied were the doilies and the paper bag medallions. I didn't have any paper bags with me. I have not seen one in years! So I  bought scrap book paper that looked like the paper bag material. So here is what my wreath looks like!


I glued glittery hearts to the centers of the doilies. Then for the brown paper bag medallions I put a red glittery G in the center (G for my last name) and a red heart jewel in the center of the other paper medallion. By the way those paper medallions were so hard to make! I had never done them. I looked up youtube videos and I didn't have the proper Martha Stewart tools to make them all pretty. All I used was a ruler. It took me several tries to get it right. I almost pulled my hair out because I was so frustrated that they weren't turning out. But I am a very determined person so I wasn't going to give up until they turned out decent enough.
 
Close up of the doilies and paper bag medallions

In the center of the wreath I glued a red bow that I made out of wired ribbon and glued a rhinestone in the center of it. I love bows. I think they are so cute on wreaths! I wanted to put the burlap garland with the little red hearts like Chelsea's wreath but the strings of the bow would have covered it. :/

And that's it! I am just so pleased with this wreath that I am going to have it up all year long. The colors go with the theme of my living room. Thank you Chelsea for making this beautiful wreath! You inspired me to make my own and I am happy I came across your blog. :) Time for bed. The husband is waiting for me to hop in bed. Night!

Nayeli

Saturday, February 8, 2014

Valentines Day Decor


Its been a while since I have blogged. It has been hard for me to keep up with my blog. I am not an experienced blogger and I don't know how often people post on their blog but I will keep trying to make the effort. I do enjoy blogging and showing off my crafts. :) So on with my Valentines Day décor. A few weeks ago I posted my clothespin Valentines Day Wreath and some of my décor. I was not happy with it so I redid it. The picture above is what I did! Everything in this picture I got from the dollar store except for the two small frames. They were at Michaels for $1 each. I think I bought them last year.

Let me explain how I made my Valentines frames. They are very easy to do.

For the little picture frames I kept the paper that was inside the squared one and just put a glittery heart shape foam in the center. For the oval picture frame I printed out the words love, cute it in the shape of the picture frame and placed it in. I wanted to perfect cubed love letters but I could not find one I really liked. The one I used was perfect BUT it had some black words at the very bottom. I made the mistake by putting white out on the words and now it doesn't look that great. No matter. I am not picky.
 I just love how this little frame turned out. So simple and cute!

Here is what I meant about the white out. It looks so pretty with the words love but that white out killed it. lol I am thinking of just reprinting it and leaving the small black letters that were there. 

For the white and red heart frame I bought a frame from the dollar tree and some heart doilies. The red heart in the middle I bought a package at Target for $1. The red cardstock I bought at Joanns Fabrics for 60 some cents I think. The frame was brown so I painted it with white acrylic paint. Then I cut the red card stock to the size of the frame. Last I glued the white heart shaped doily in the center and then the red heart in the center of the doily. Now you are ready to place it in the frame. Tada! Easy right?

Ok on to the doily and heart vases!

For these cute heart doily vases all I did was cut out red hearts from the card stock I had left over. Then I glued them in the center of the doilies and glued that to the vases. By the way the vases I had from a while back but I bought them at dollar tree! The roses I also bought from dollar tree.
 Close up of the doilies
So that is my Valentines Day décor! I am pretty pleased with it. :) Above this décor I have my Valentines Day clothespin Wreath and the garlands as well. Tomorrow I will have a new post up on a wreath I made inspired from another blogger. I just love this wreath! Stay tuned! Time to get some sleep.

Nayeli